Troubleshooting for Hypertherm cartridge installation faults (0-14-n)
An 0-14-n fault identifies a condition where the Hypertherm® cartridge is not recognized or is not operating correctly.
Fault codes and fault LEDs
| Fault code | Fault LEDs | Torch LED | Description | Stops the system from operating? |
|---|---|---|---|---|
| 0-14-0 |

ON 
ON |

Flashes yellow |
This fault shows when you install a Hypertherm cartridge, and it cannot
send data to the plasma power supply. This fault code stops the
system from operating. Electrical noise can cause a bad data connection. For example, high frequency electrical noise from TIG welders can cause interference. Keep electrical noise in the work area as low as possible. To prevent
possible damage to the workpiece and Hypertherm cartridge, the system
automatically:
If necessary, you can manually change these settings to cut without a data connection. |
Yes |
| 0-14-1 |
ON |
This fault shows when a Hypertherm cartridge cannot send data to the plasma power supply for some reason. This fault code does not stop the system from operating. This error code occurs most likely due to poor Hypertherm cartridge installation. | No |
Corrective action for 0-14-0 faults
- Decrease electrical noise in the work area as much as you can.
- Set the torch-lock switch to the yellow lock (X) position and then back to the green "ready to fire" position.
- Do a quick restart.
- Install the Hypertherm cartridge again.
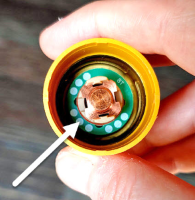
Corrective action for 0-14-1 faults
-
Make sure that the green ring inside the Hypertherm cartridge is not broken.