Use the XPR web interface with Wi-Fi and a DHCP-capable router to connect
You must connect to the plasma power supply through the Internet Protocol (IP) network before you can configure the Ethernet Local Area Network (LAN) settings for your cutting system. This information prepares you to use an Ethernet LAN interface and Dynamic Host Configuration Protocol (DHCP)-capable router to connect to the plasma power supply.
The preferred method to connect to the plasma power supply and configure Ethernet LAN settings is to use the XPR® web interface through Wi-Fi® with a router that has DHCP capabilities. If the option to use the XPR web interface through Wi-Fi and a DHCP-capable router is not available, refer to Use the XPR web interface and no router to connect.
You must have a computer-based device with a screen, a web browser that has support for the latest web standards, wireless access, and a router that as DHCP capabilities.
-
Go to the
Other
screen.
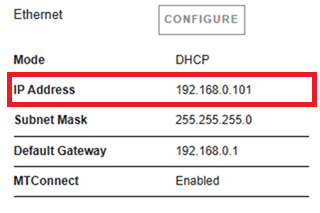
The assigned IP address for the connected plasma shows in the field near IP Address in the Ethernet section of the Other screen.
- The plasma power supply is now connected.
- The default Ethernet LAN settings will work with the DHCP-capable router. It is not necessary to change the default Ethernet LAN settings. But you can change the settings if you want.
- Do the procedure in Configure Ethernet LAN settings if you want to change the settings.
- Use Ethernet LAN to get access to the XPR web interface.